Shoe product photography requires 7-8 angles per listing (side profile, 3/4 view, front, back, top-down, sole, detail, and lifestyle), material-specific lighting (diffused panels for patent leather, directional light for suede), and careful styling with stuffing, lacing, and invisible supports. For brands managing dozens or hundreds of SKUs across multiple colorways, AI tools like Nightjar can expand a single well-shot photo into a cohesive set of variants and color options, helping brands cut catalog photography costs while keeping a consistency that multi-session studio shoots struggle to match.
The Math Behind a Competitive Shoe Listing
Photographing a single pair of shoes well is straightforward. Most guides on the internet will get you there. Photographing 100 SKUs in 8 colorways at 7 angles each produces 5,600 images. That is a production problem, and it breaks most workflows.
Amazon listings with 7-8 images convert at the highest rates, and 60% of US digital shoppers need to see at least 3-4 images before they feel confident enough to buy. Thirteen percent need five or more. eBay's own research found that going from zero images to one doubles conversion, and going from one to two doubles it again. The pattern is clear: more angles, more sales.
This guide covers the craft of shoe product photography (angles, lighting by material, styling) and the production economics that most guides ignore. Because the real challenge is not making one pair look good. It is maintaining that standard across an entire catalog without a six-figure budget. The most practical approach for most footwear brands in 2026 is a hybrid one: shoot one hero photo with real skill and care, then use AI to handle the multiplication. We will get to that workflow after covering the technique that makes it work.
The 8 Essential Shoe Photography Angles
Every shoe listing needs 7-8 images to be competitive. Here is exactly what each angle captures and how to position your camera.
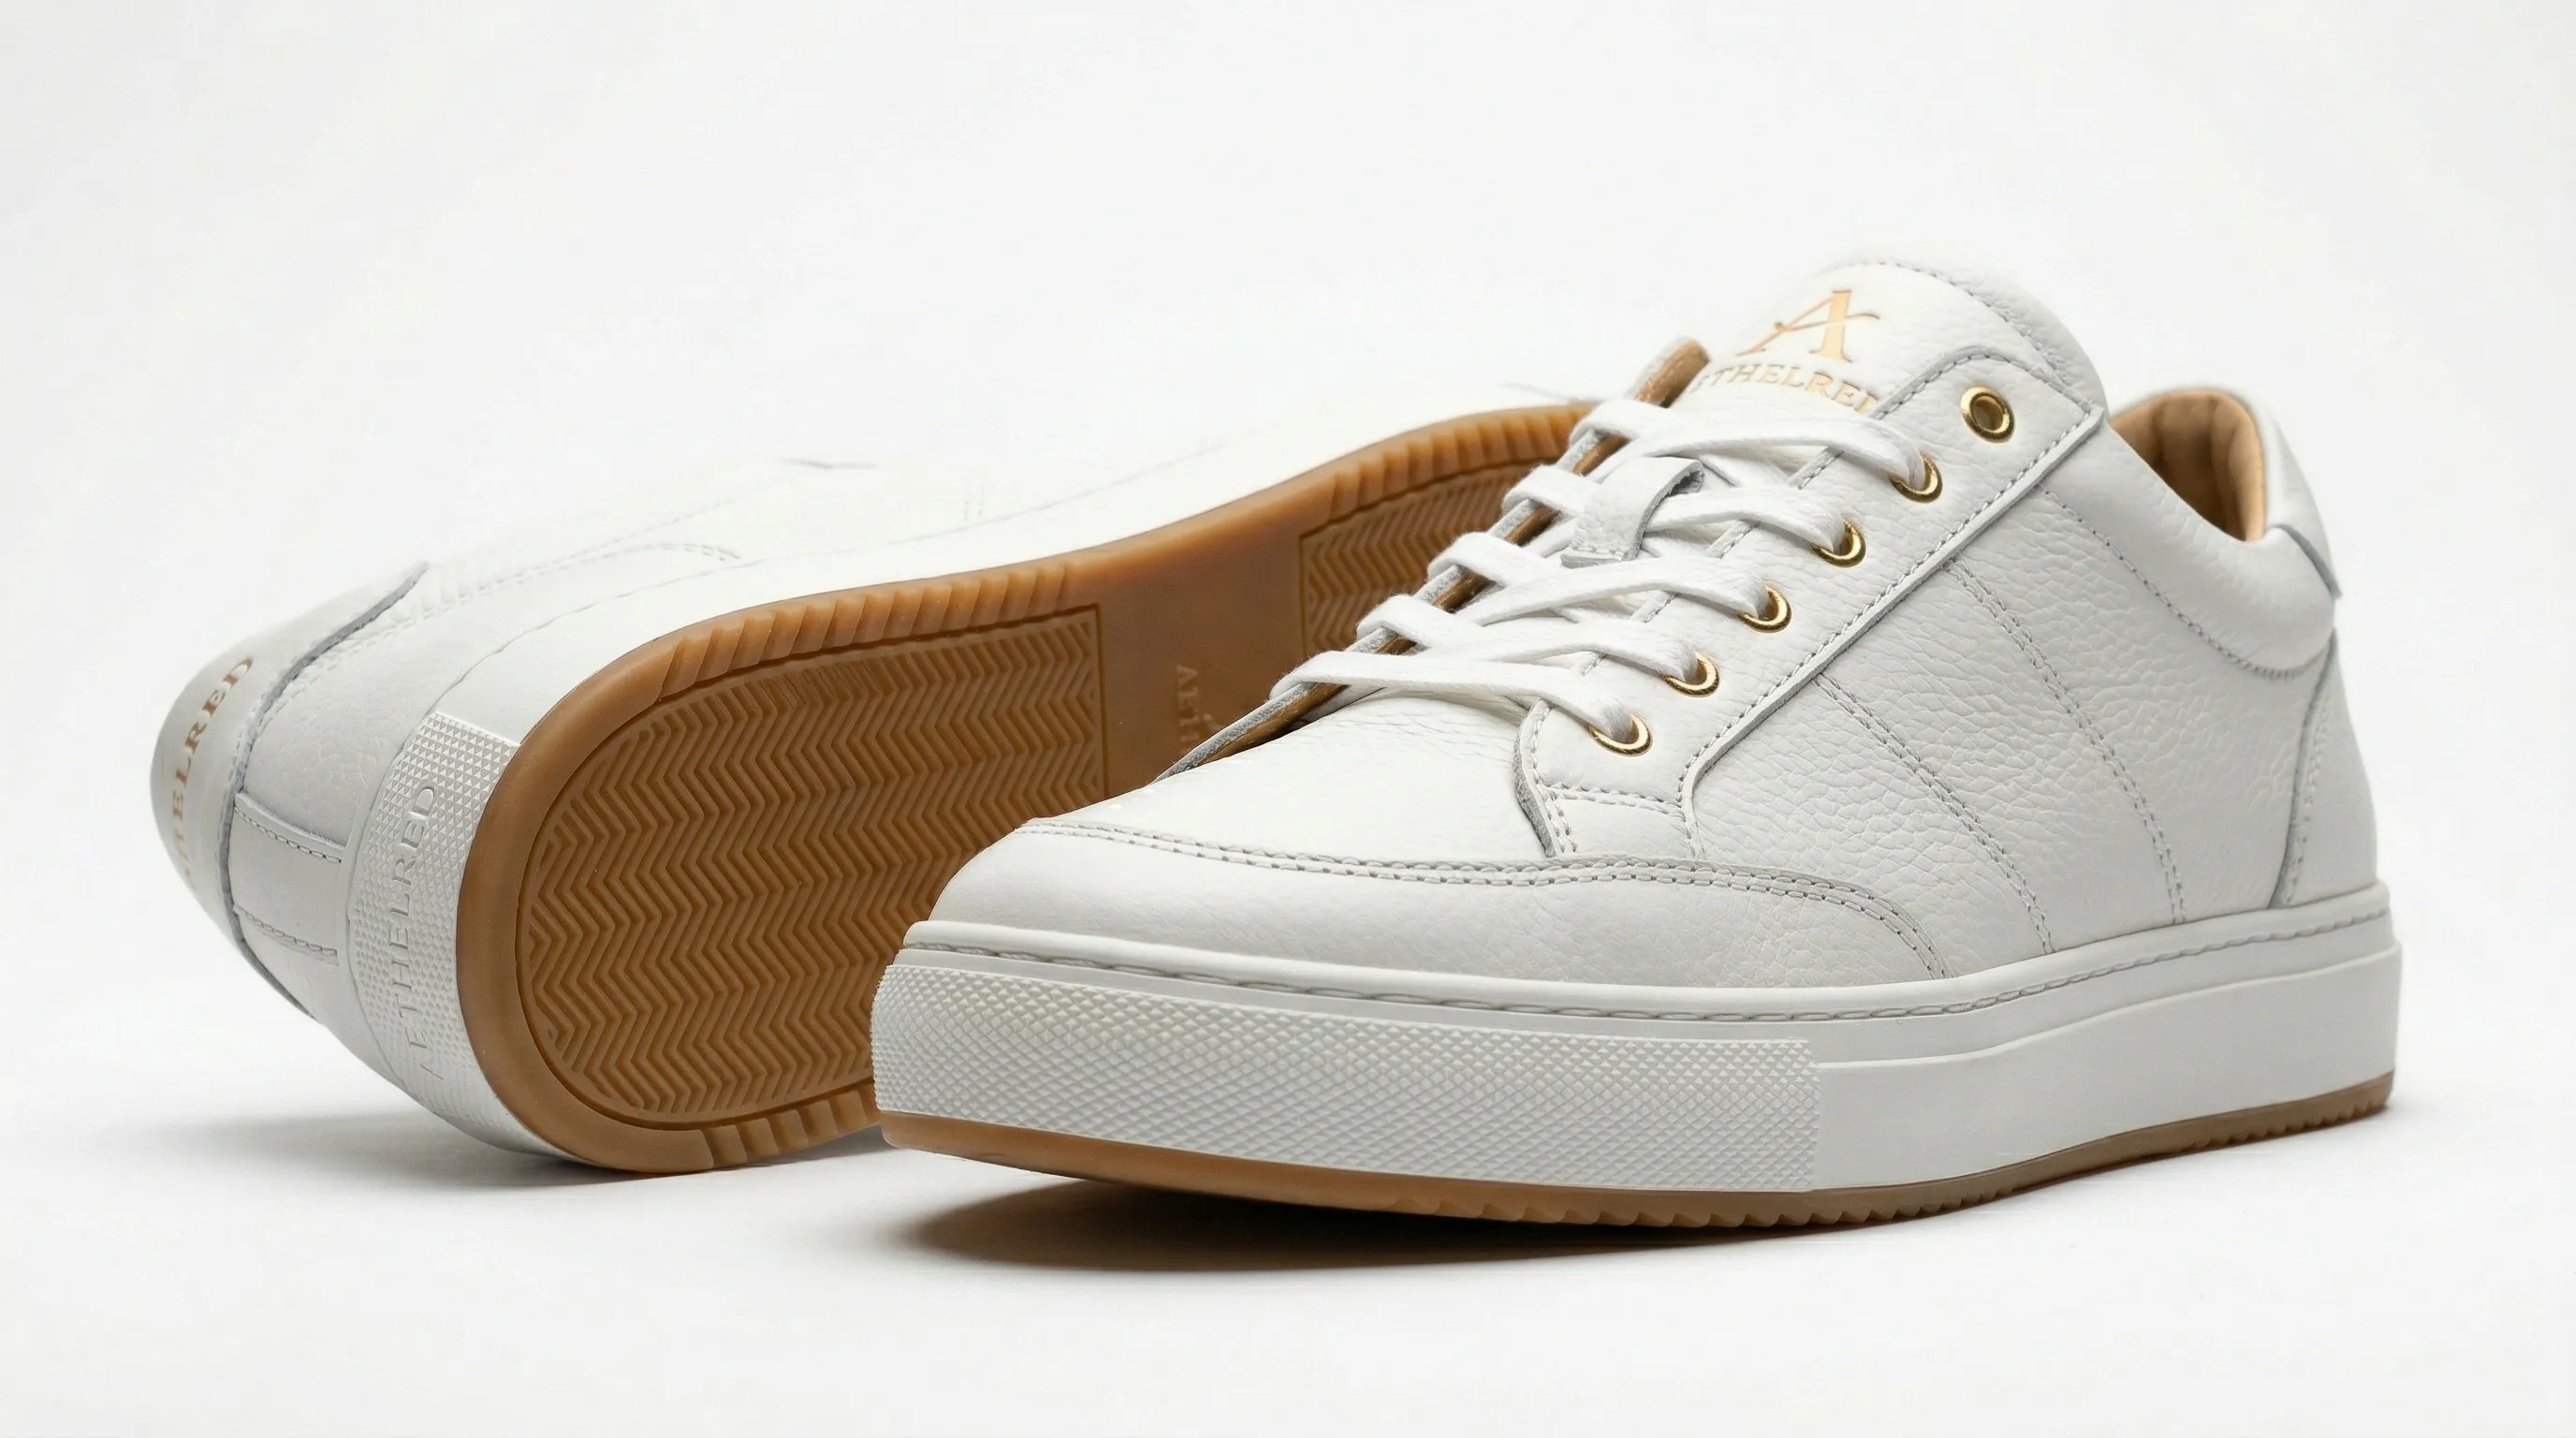
1. Side Profile (Eye-Level, 0 Degrees)
The foundational angle. It captures the overall silhouette, arch, sole profile, and proportions of the shoe. Position your camera perpendicular to the shoe's longest axis, at shoe height. No elevation. This is the angle that communicates the shoe's basic identity.
2. Three-Quarter View (45 Degrees, Slightly Elevated)
This is the hero shot. It shows the toe box, side, laces, and partial sole simultaneously, making it the most information-dense single angle you can capture. Camera goes at roughly 30-45 degrees above and 45 degrees to the side. Amazon requires exactly this angle for main images: single shoe, angled left at 45 degrees. If you only have time for one angle, this is the one.
3. Front View
Directly facing the toe. This angle reveals the toe box shape, width, lace pattern, and tongue. Customers use it to assess fit and width, two of the biggest concerns when buying shoes online.
4. Back / Heel View
Camera at shoe height, directly behind the heel. Shows heel height, pull tabs, back branding, and counter construction. Essential for heels and boots. Often skipped by sellers, which means including it gives you an edge.
5. Top-Down / Bird's Eye (90 Degrees Overhead)
Camera directly overhead, pointing straight down. Captures width, toe box shape, lace layout, and insole details. Gives customers a sense of proportion that side angles cannot.
6. Sole View
Tread pattern, sole material, brand markings. Amazon requires sole visibility somewhere in your image set. You can shoot the sole flat (facing the camera) or at an angle that shows both the tread and part of the upper.
7. Detail / Close-Up Shots
Stitching quality, logo placement, material textures, hardware like buckles and eyelets. Aim for 2-3 detail shots per shoe, each covering a distinct feature. A macro lens helps here, though close focus on a standard lens works in a pinch.
8. Lifestyle / On-Foot Shot
Scale, fit, and real-world context. This can be a foot model wearing the shoe in a natural setting, or an AI-generated on-foot image. Lifestyle shots are what turn a product page from a spec sheet into something a customer can imagine wearing.
Producing all 8 angles for a single pair takes maybe an hour with the right setup. Producing them for every SKU in a catalog is where the real time sink lives. For more on generating multiple views from a single product photo, see AI Camera Angle Control: Generate Multiple Product Views from One Photo.
Lighting for Different Shoe Materials
This is where most shoe photography guides fall short. They give you one lighting setup and call it done. But materials absorb and reflect light differently, and a setup that makes suede look rich will turn patent leather into a mirror reflecting your studio equipment. Here is what works for each material.
Patent Leather (High Gloss)
Patent leather acts as a mirror. It reflects everything in the environment, including your softbox, your tripod, and you.
The solution is very large diffusion panels, 2-3 times the size of the shoe, positioned close. These create soft gradient reflections with no hard edges. As one photographer on DPReview put it: "Light panels shine for patent leather photography because you can set up the panel with a hotspot while the light will still reflect (which keeps the material looking shiny) but will have soft edges and transitions."
Avoid bare softboxes (they produce crisp rectangular reflections), umbrellas (spoke pattern reflections), and direct flash. A polarizing filter can reduce unwanted glare, but overuse kills the natural shine that makes patent leather look like patent leather. The goal is not eliminating reflections. It is controlling what the shoe reflects.
Full-Grain Leather
Semi-reflective. Prone to hot spots that flatten the grain texture and make the leather look plasticky.
Use soft diffused lighting from both sides, positioned at 35-55 degree angles to the shoe. Angled light is what reveals grain texture. Flat, front-on light erases it. Polish the shoes before shooting to give them a fresh-from-the-box appearance.
Suede and Nubuck
Suede absorbs light. Under even illumination, it looks flat and dull, which is the opposite of what you want.
Use slightly more directional light than you would for smooth leather to bring out the nap texture. Before shooting, brush the suede so the bristles align in one direction, and keep that brushing direction consistent across your entire catalog. Harsh direct light makes suede look shiny and greasy, which defeats the entire point of a matte material.
Canvas and Textile
The most forgiving material to light. Even basic window light works well for canvas.
Use even, soft lighting for general views. For texture-emphasis shots, angle the light to create subtle shadows that reveal the weave pattern. Prep matters here too: steam or iron out wrinkles, and run a lint roller over the surface to remove stray fibers.
Mesh and Knit (Athletic Shoes)
Mesh is semi-transparent, which creates a unique challenge: it can reveal internal structure, stuffing, or paper inserts.
Use dark-colored tissue for internal stuffing so fill material does not show through the weave. Backlighting creates an appealing halo effect that highlights the mesh texture and communicates breathability. Front lighting makes mesh appear more opaque. Choose based on what you want to emphasize.
Translucent Soles (Ice/Clear Outsoles)
Transparent soles pick up color from whatever surface they sit on. That surface becomes part of your image, whether you intended it or not.
The best approach is to backlight or underlight through a sheet of plexiglass. This creates a clean glow effect and keeps the sole looking transparent rather than muddy. Choose your shooting surface deliberately.
For a broader breakdown of lighting and camera technique, see How to Take Professional Product Photos in 2026.
Styling and Preparation: Making Shoes Look Their Best
"Nothing is more unflattering than a limp, lifeless pair of shoes." Styling is the difference between a shoe that looks like it belongs on a shelf and one that looks like it belongs on a foot.
Shape Preservation
An empty shoe collapses. Toe boxes crumple, boot shafts droop, and the shoe loses the silhouette that makes it attractive.
Crumpled tissue paper is the most common fix: stuff the toe box and body until the shoe holds its natural shape. For structured leather shoes, shoe trees are better and give you consistent form across a catalog. Boot shafts need cardboard tubes to stay upright. For specific shapes, custom-cut foam inserts are reusable across shoots and worth the small investment if you are shooting more than a few pairs.
Lacing Techniques
Laces communicate care. Sloppy lacing makes even an expensive shoe look cheap.
Display lacing uses a structured, even pattern that looks polished and intentional. The wire-in-lace trick is worth knowing: thread thin wire alongside the lace near the aglet, then bend it into shape for a "frozen motion" effect. For flying laces (suspended in mid-air), use clear fishing line from a rack above the shoe and remove the line in post-production. Whatever technique you choose, use the same lacing pattern and tension on every shoe in the catalog. Consistency matters more than cleverness.
Invisible Supports and Cleaning
Fishing line or monofilament creates a "floating" effect you can edit out later. Gaff tape holds straps, tongues, and flaps in position more reliably than rubber bands. Wear gloves when handling patent leather and vinyl to avoid fingerprints. Keep a microfiber cloth on set for buffing between shots.
White soles stain easily. A magic eraser or dedicated sole cleaner before the shoot saves retouching time later. This is one of those small things that adds up fast when you are shooting dozens of pairs.
Camera Settings for Shoe Photography
| Setting | Recommendation | Why |
|---|---|---|
| Lens | 50mm (general); macro (details) | Natural perspective, no distortion |
| Aperture | f/8 to f/16 (f/11 sweet spot) | Maximum sharpness across the entire shoe |
| ISO | 100 (lowest native) | Minimal noise |
| White balance | Manual: flash ~5500K, daylight ~5600K | Color accuracy across the catalog |
| Format | RAW | Post-production flexibility |
| Tripod | Required below 1/60 shutter speed | Shot-to-shot consistency |
Sources: Shopify Blog, PhotoRobot
Set white balance manually and leave it locked. Auto white balance shifts between shots and creates the kind of subtle color inconsistency that is expensive to fix in post. If you are shooting multiple shoe materials in a single session, the locked white balance also ensures your leather browns and suede tans stay true across the catalog.
Platform Requirements for Shoe Listings
Different platforms have different rules. A brand selling on Amazon, Shopify, and Poshmark needs different image specs from the same product.
| Platform | Resolution | Background | Key Shoe Rule | Max Images |
|---|---|---|---|---|
| Amazon | 2,000px+ (min 1,000px) | Pure white (RGB 255,255,255) | Single shoe, 45-degree left-facing; sole must appear | 9 (7-8 recommended) |
| eBay | Min 500px; max 9,000px | White/neutral preferred | Show exterior and interior; actual item for used | 24 (3-12 recommended) |
| Shopify | 2,048 x 2,048px recommended | No requirement | Full creative control | Unlimited |
| Poshmark | 1,200 x 1,200px (square) | Auto white on cover | Full front, label close-up, sole photo, heel measurement for heels | 16 (8-16 recommended) |
| StockX | No minimum specified | Clean white preferred | Side-on or 3/4; consistent neat laces | Varies |
Sources: Amazon Seller Central via BridgewayDigital, eBay Picture Policy, Shopify Help Center, PixFocal Poshmark Guide, StockX News
Shooting three separate sets per SKU to satisfy three platforms is impractical at any real scale. This is where generating platform-specific outputs from a single source photo saves serious time. For a deeper look at Amazon-specific requirements, see Amazon Product Photography: Requirements, Costs, and the Best Approach for 2026. For Shopify sellers, Shopify Product Photography: The Complete Pipeline From Photo to Storefront covers the full upload workflow.
Common Shoe Photography Mistakes
- Shooting shoes flat. Flat lay makes shoes look limp and obscures their true shape. Shoes are three-dimensional objects. Photograph them that way.
- Too few angles. One or two views when customers need seven or eight. Every missing angle is a question the customer cannot answer, and unanswered questions kill conversions.
- Inconsistent cropping and framing. Different zoom levels across the catalog look unprofessional on a product page, even if each individual image is fine.
- Poor preparation. Dirty soles, creased uppers, misaligned laces. Customers notice.
- Harsh direct lighting. Creates hotspots on glossy materials, distorts colors, and highlights every flaw.
- Cluttered backgrounds. Distracts from the product and violates most marketplace requirements.
- Over-editing. Excessive saturation or sharpening makes images look unrealistic. 22% of e-commerce returns happen because the product looks different from the photos.
- Skipping sole shots. Amazon requires sole visibility. Customers want to see tread pattern and wear indicators.
- Shooting too close. Wide-angle distortion warps shoe proportions. Step back and use a longer focal length.
- Visible supports. Paper stuffing showing through mesh, fishing line not removed, tape edges catching the light. These are easy to prevent, harder to fix in post.
The Scale Problem: Why One Good Photo Is Not Enough
Everything above teaches you how to photograph one pair of shoes well. And if you are selling a few pairs on Poshmark, that might be all you need.
But a brand with 100 SKUs in 8 colorways needs 5,600 images at 7 angles per listing. Shooting one pair beautifully is documented everywhere. Maintaining that standard across a full catalog is the real challenge, and it is the one nobody talks about.
The issue is what you might call "visual drift." When shoots span multiple days, sessions, or photographers, subtle differences creep in. Shadow angles shift. Color temperature wanders. Cropping ratios change. Individually, each image might look fine. Viewed together on a product page or category grid, the inconsistency is obvious. Consumers notice even when they cannot articulate what feels off.
Then there is the cost of fixing it. Retouching to normalize color temperature runs $10-25 per image. Re-cropping for consistent framing adds $5 per image. Re-shooting outliers that do not match costs $200-600 per SKU. For a 100-SKU catalog, this "consistency tax" adds $3,000-8,000 on top of raw photography costs.
And colorways make everything worse. Each additional color variant requires a full reshoot in traditional photography. 11% of consumers cite color inaccuracy as a return reason, so you cannot just Photoshop a color swap and call it done. The shadows, reflections, and material response all change with color.
Here is what the cost curve looks like at catalog scale:
| Method | Per-Image Cost | Total (100 SKUs x 8 colorways x 7 angles) | Timeline | Consistency |
|---|---|---|---|---|
| Professional studio | $75-200 | $420,000-1,120,000 | 4-6 months | Low (multiple sessions) |
| DIY photography | $5-15 (time-adjusted) | $28,000-84,000 | 3-6 months | Very low |
| AI (Nightjar) | ~$0.10-0.25 | $560-1,400 | 1-2 weeks | High (algorithmic) |
Sources: soona pricing data, Nightjar Amazon Blog, Nightjar Color Variants Blog
At catalog scale with colorways, the cost gap between traditional and AI photography is not 10x. It is 300-800x. That is because colorways create a multiplicative effect: each additional color variant adds a full reshoot in traditional photography but costs almost nothing with AI.
The AI Shortcut: From One Photo to a Full Shoe Catalog
AI is not a replacement for knowing how to photograph shoes. Everything in this guide still matters, because AI needs a good source photo to work from. The hybrid approach is what actually works: shoot one hero photo per SKU with proper technique, then let AI handle the multiplication.
The Hybrid Workflow
- Shoot one hero photo per SKU using the angles, lighting, and styling techniques covered above. The 3/4 view is the best starting point.
- Upload to an AI product photography tool.
- Expand that single photo into a cohesive set of related variants (different pose, framing, and camera angle).
- Generate color variants for every colorway using exact hex codes.
- Generate lifestyle and on-foot shots using a reusable Photography Style.
- Export at platform-specific resolutions for Amazon, Shopify, Poshmark, and wherever else you sell.
What AI Handles Well
Cohesive variant expansion is the biggest win. Nightjar has a Workflow called Photoshoot that takes one strong source photo and expands it into a set of related variants that feel like one shoot, varying pose, camera angle, framing, and crop while keeping the same product, lighting, and styling. That is how you fill out a listing gallery without a multi-day studio booking.
Color variant production is the second. A shoe in 8 colorways traditionally means 8 separate shoots. Nightjar's Recolor Edit Shortcut, a fast path in the Edit tab, changes a product's color to a specific hex code from one photo, helping preserve material texture (leather grain, suede nap, mesh weave) and natural shadows. The colors are brand-accurate rather than approximated.
Catalog consistency is the third. Nightjar separates the photographic look into a reusable Photography Style (camera, lighting, mood) and pose, framing, and angle into a separate reusable Composition. Reusing the same ingredients across products, and saving the full setup as a Recipe, keeps visual drift low between session one and session five.
And platform-specific output means the same source photo can produce Amazon-compliant images (white background, 45-degree angle, 2048px), Shopify lifestyle shots, and Poshmark square formats without separate shoots.
What Still Needs a Camera
The initial hero photo. AI needs an accurate reference, and the quality of the source image determines the quality of everything generated from it. The techniques in this guide are what make that source image good enough to scale from.
Unique hand-crafted details that must be photographed exactly as they exist on the physical product. Custom leatherwork, hand-painted elements, one-of-a-kind finishes.
Used or resale items. If customers need to see the exact physical item (eBay used listings, Poshmark resale), AI-generated angles are not appropriate. Photograph the actual product.
A Real-World Example
A sneaker brand with 80 styles in 6 colorways needs 3,360 images (80 x 6 x 7 angles). Traditional photography at $100/image average: $336,000 over 3-4 months. The hybrid approach: shoot 80 hero photos in a well-organized 4-day studio session ($8,000-16,000), then generate remaining angles via AI ($48-120 for 480 additional angle images) and all colorway variants ($240 for 2,400 color variant images). Total: $8,288-16,360. That is a 95-97% cost reduction and an 85-90% time reduction.
For more on multi-angle generation from a single photo and AI color variants that replace reshoots, those guides go deeper into the specific workflows.
AI Tools for Shoe Product Photography Compared
Not all AI tools are built for product photography, and among those that are, capabilities vary significantly. Here is how the main options compare for footwear catalog production specifically.
| Capability | Nightjar | Photta | Flair.ai | Midjourney/DALL-E |
|---|---|---|---|---|
| Cohesive variant expansion (Photoshoot) | Yes | Limited | No | No (no product consistency) |
| Color variants (hex-code precision) | Yes | No | Limited | No |
| Catalog consistency (reusable ingredients, Recipes) | Yes | No | No | No |
| Material texture preservation | High fidelity | Moderate | Moderate | Low |
| English-based editing | Yes | No | No | Prompt-only |
| E-commerce resolution (2048px+) | Default | Varies | Varies | Requires upscaling |
| Per-image cost | ~$0.10-0.25 | Subscription | Subscription | ~$0.02-0.10 |
Generic AI tools like Midjourney and DALL-E are cheaper per image, but they cannot reliably reproduce a specific product across multiple generations. Every output looks slightly different, which defeats the purpose for catalog work. Photta and Flair.ai have e-commerce capabilities, but lack the catalog-scale consistency workflow and hex-code color variant production that footwear brands need when managing dozens of SKUs across multiple colorways.
For a broader comparison, see 10 Best AI Product Photography Tools in 2026.
Frequently Asked Questions
What is the best angle to photograph shoes for ecommerce?
The 3/4 view (45-degree angle, slightly elevated) is the single most effective angle for shoe product photography. It shows the toe box, side profile, laces, and partial sole in one shot. Amazon requires this exact angle as the main listing image: single shoe, angled left at 45 degrees. For a complete listing, pair the 3/4 view with side profile, front, back, top-down, sole, detail, and lifestyle shots for 7-8 total images.
How many product photos do I need for a shoe listing?
Amazon listings with 7-8 images convert at the highest rates. At minimum, include a side profile, 3/4 view, front view, back view, top-down, and sole shot. Add 1-2 detail close-ups or lifestyle images to reach the 7-8 range. On eBay and Poshmark, top sellers typically upload 8-16 images per listing.
How do you photograph shoes without reflections and glare?
For glossy materials like patent leather, use very large diffusion panels (2-3x the size of the shoe) positioned close to create soft gradient reflections rather than hard-edged hotspots. Avoid bare softboxes, umbrellas, and direct flash. A polarizing filter can reduce unwanted glare, but use it carefully to avoid killing the material's natural shine. The goal is controlling what the shoe reflects, not eliminating reflections entirely.
What background should I use for shoe product photography?
Pure white (RGB 255,255,255) for Amazon and most marketplace listings. Amazon requires it for main images, and eBay and StockX prefer it. Shopify sellers have more creative freedom and can use colored or lifestyle backgrounds for secondary images. Poshmark now auto-applies a white background to cover photos.
Can AI generate product photos of shoes from a single image?
Yes. AI tools like Nightjar can expand a single product photo into a cohesive set of related variants (different pose, framing, and camera angle), produce color variants using exact hex codes, and generate lifestyle shots. The most practical approach is a hybrid workflow: shoot one high-quality hero photo per SKU, then use AI to expand the gallery and produce all colorway variants.
How do you keep shoe photography consistent across a full catalog?
Consistency across dozens or hundreds of SKUs is the hardest part of shoe catalog photography. Traditional approaches require same-day shoots with identical lighting rigs, detailed shot lists, and post-production normalization, which still results in visual drift across sessions. AI tools reduce this through reusable controls: in Nightjar, framing and angle are saved as a reusable Composition and the photographic look as a reusable Photography Style, and the full setup can be saved as a Recipe and applied across products, which cuts down the consistency tax of multi-session shoots.
How do you photograph different shoe materials like patent leather and suede?
Each material requires a different lighting approach. Patent leather needs very large diffusion panels for soft gradient reflections. Suede needs slightly directional light to bring out nap texture (brush in one direction first). Full-grain leather needs soft diffused light from both sides at 35-55 degree angles. Canvas is the most forgiving material and works well with basic window light. Mesh benefits from backlighting to highlight the weave texture and communicate breathability.
The technique matters. Good shoe photography starts with understanding angles, materials, and how to style a shoe so it looks like something a person would want to wear. But at catalog scale, the workflow determines whether a footwear brand spends $300,000 or $15,000 on imagery. Master the hero shot, then let AI handle the multiplication. That is the approach that works in 2026, and it gets better every quarter as the tools improve. If you want to try the hybrid workflow on your own catalog, Nightjar is a good place to start.
References
- Nightjar - AI product photography platform
- Shopify Blog: How to Take Pictures of Shoes - Comprehensive shoe photography guide
- Pixelz: Dos and Don'ts of Footwear Photography - Professional footwear photography standards
- Pixelz: More Product Images Mean More Sales - eBay conversion data
- soona: Footwear Photography Ecommerce - Practical shoe photography tips
- soona: Product Photography Pricing - Industry pricing benchmarks
- PhotoRobot: How to Take Pictures of Shoes - Professional equipment and technique guide
- DPReview Forums: Patent Leather Photography - Patent leather lighting technique
- StockX News: How to Shoot Your Sneakers - StockX photo recommendations
- Straits Research: E-Commerce Footwear Market - Market size data
- GrabOn: Product Photography Statistics - Consumer behavior and return statistics
- BridgewayDigital: Amazon Photography Requirements 2026 - Amazon image specifications
- eBay Picture Policy - Official eBay image guidelines
- Shopify Help Center - Shopify image specifications
- PixFocal: Poshmark Photo Size Guide - Poshmark specifications