The Shadow Problem Every E-commerce Seller Faces
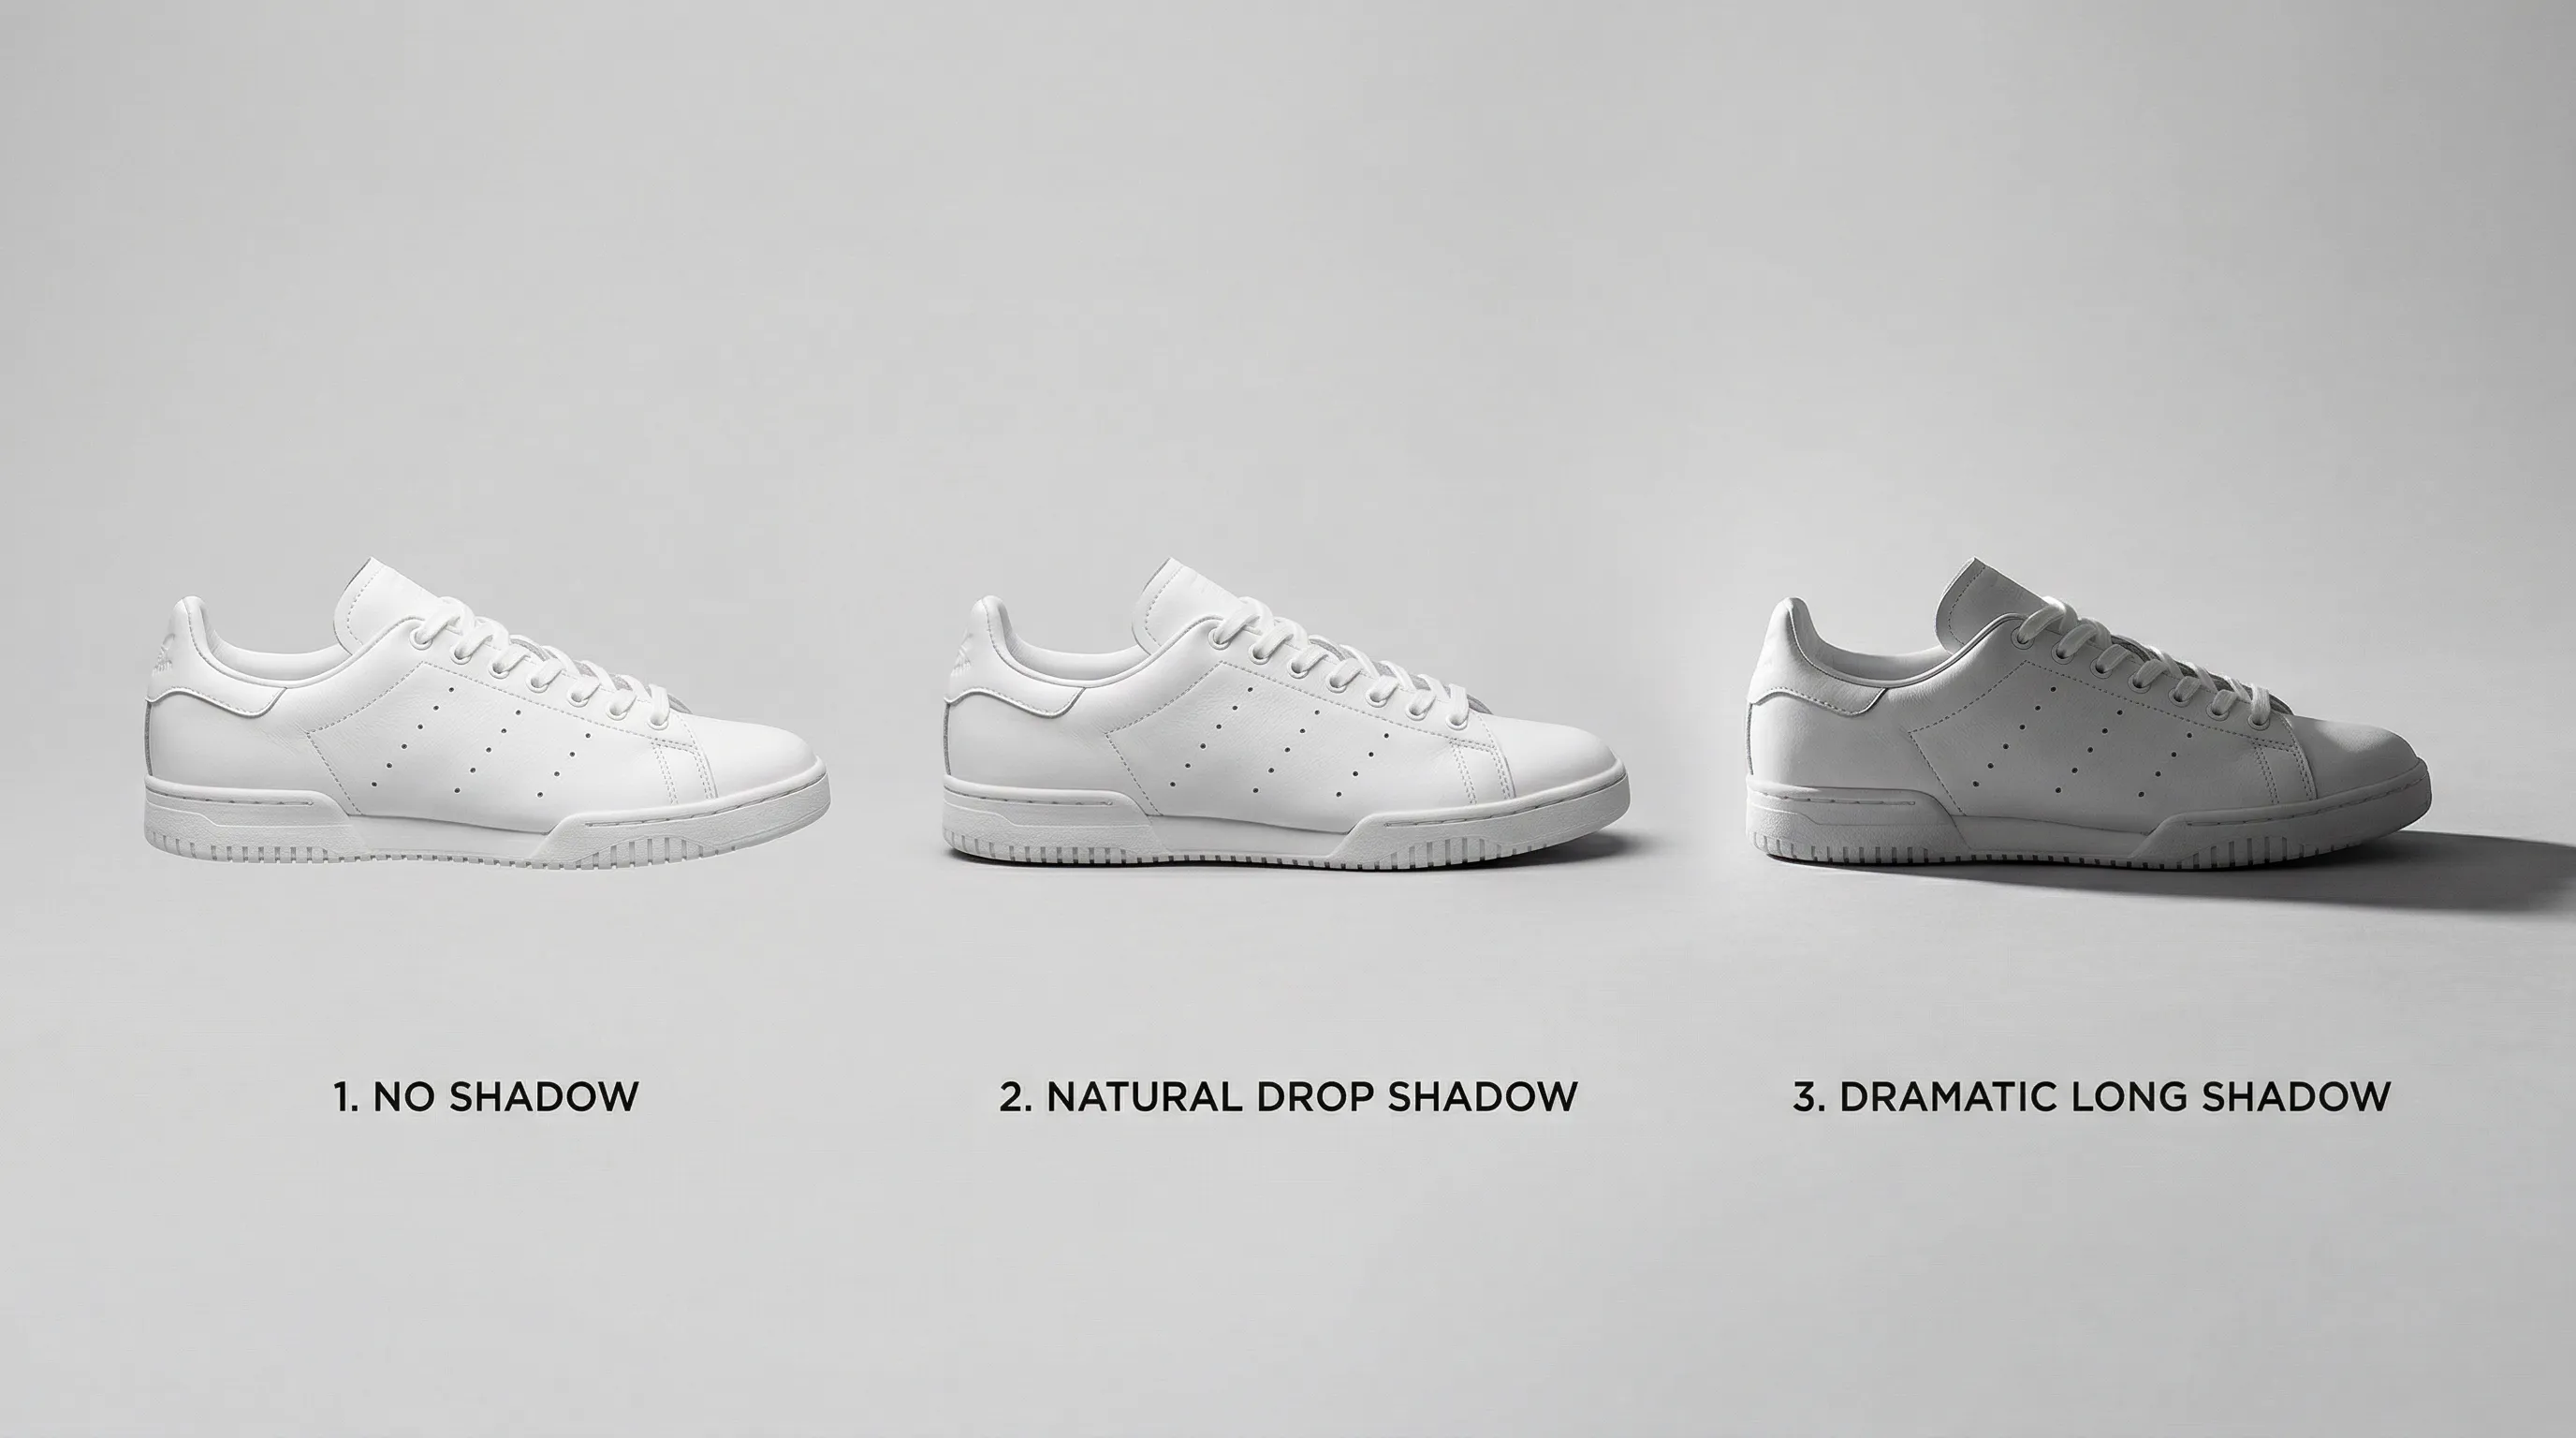
Shadows ground products in reality. Without them, your product floats against the background like a poorly composited stock image. With the wrong shadows, you signal amateur hour to every shopper who lands on your page.
The challenge runs deeper than knowing which Photoshop tool to click. Most tutorials explain how to remove or add shadows but never address when each approach makes sense. A jewelry seller needs reflection shadows. A furniture brand needs drop shadows. An Amazon seller needs minimal shadows on main images and can use natural shadows on secondary ones. The platform, the product category, and your catalog size all dictate the right approach.
This matters commercially. 88% of consumers rate clear product photography as a major factor when making online purchases. 22% of product returns happen because items look different in person than in photos. Shadows are part of that equation.
Whether you need to remove harsh shadows for Amazon compliance or add professional drop shadows to make furniture look grounded, this guide covers both the Photoshop techniques and faster alternatives for brands dealing with large catalogs.
When to Remove Shadows vs. When to Add Them
Before touching Photoshop, decide what your shadow strategy should be. This depends on where you sell and what you sell.
Platform Requirements for Product Photo Shadows
| Platform | Shadow Policy | Main Image | Secondary Images |
|---|---|---|---|
| Amazon | Pure white (RGB 255,255,255); minimal shadows on main | Remove or subtle contact shadow only | Shadows permitted for lifestyle context |
| Shopify | Full flexibility; seller-controlled | Brand preference | Brand preference |
| Etsy | Avoid harsh shadows; diffused lighting recommended | Soft shadows acceptable | Lifestyle shadows encouraged |
| eBay | White or light neutral background preferred | Minimal shadows safest | More flexibility |
Amazon is the strictest. Main images require pure white backgrounds, and heavy shadows can trigger listing suppression. The safest approach: remove shadows entirely or keep only the faintest contact shadow.
Shopify gives you complete freedom since you control your own storefront. Match your brand aesthetic.
Etsy shoppers expect warmth and authenticity. Soft, diffused shadows work well. Harsh directional shadows feel out of place.
Which Shadow Type for Which Product Category
| Shadow Type | Best For | Avoid For | Visual Effect |
|---|---|---|---|
| No shadow (pure white) | Amazon main images, clinical/medical products | Luxury goods, furniture | Clean, sterile, marketplace-compliant |
| Drop shadow | Furniture, shoes, home goods, flat-lay | Reflective products, jewelry | Depth, grounded feel |
| Reflection shadow | Jewelry, tech gadgets, cosmetics, luxury items | Textured fabrics, matte products | Premium, polished |
| Natural/cast shadow | Lifestyle products, outdoor contexts, textured items | Amazon main images | Realistic, authentic |
| Soft diffused shadow | Beauty products, food, luxury goods | Edgy/bold branding | Elegant, subtle |
A watch on a pure white background with no shadow looks clinical. Add a reflection shadow and it looks premium. A leather couch needs a drop shadow to feel substantial. A handmade ceramic mug on Etsy benefits from soft natural light and gentle shadows that communicate craftsmanship.
How to Remove Shadows in Photoshop (Step-by-Step)
Different shadows require different tools. Here are the main approaches, ordered from fastest to most precise.
Using Content-Aware Fill for Large Shadow Areas
Best for uniform backgrounds with large shadow regions.
- Select the shadow area using the Lasso Tool or Quick Selection Tool
- Go to Edit > Content-Aware Fill
- Adjust the sampling area in the preview (exclude the product itself)
- Click Apply
Time: 5-15 minutes per image depending on shadow complexity.
Content-Aware Fill works well when your background is consistent. It struggles with textured backgrounds or shadows that overlap complex edges.
Clone Stamp Tool for Detailed Shadow Removal
Best for small areas requiring texture matching.
- Select the Clone Stamp Tool (S)
- Alt-click (Option-click on Mac) a clean area of your background
- Paint over the shadow, adjusting brush size as needed
- Work in small sections, resampling frequently to avoid repetitive patterns
According to Adobe's documentation, the Clone Stamp Tool "lets you 'clone' or sample a clean area of your photo and then paint right over the shadow."
Time: 10-20 minutes per image. Requires intermediate Photoshop skills.
Patch Tool for Quick Selection-Based Removal
Best for medium-sized shadows where you need quick results.
- Select the Patch Tool (J)
- Draw a selection around the shadow area
- Drag the selection to a clean area of your background
- Photoshop blends automatically
Time: 5-10 minutes per image. Good for beginners.
Healing Brush for Edge Cleanup
Best for final touch-ups after using other tools.
The Healing Brush samples texture from a source area and blends it with the color and luminosity of your target area. Use it to smooth transitions left by other tools.
Time: 3-5 minutes per image for cleanup work.
Shadow Removal Tools Summary
| Tool | Best Use Case | Skill Level | Time Per Image |
|---|---|---|---|
| Content-Aware Fill | Large shadows on uniform backgrounds | Intermediate | 5-15 min |
| Clone Stamp Tool | Small detailed areas, texture matching | Intermediate-Advanced | 10-20 min |
| Patch Tool | Medium shadows, quick selection-based | Beginner-Intermediate | 5-10 min |
| Healing Brush | Edge cleanup, minor shadow remnants | Beginner | 3-5 min |
How to Add Shadows to Product Images in Photoshop
Adding shadows requires isolating your product first. Skip this step and Photoshop treats your entire image as the subject, producing unusable results.
As Clipping Path Studio notes: "If you do not cut out the subject, Photoshop Drop Shadow will count the whole image as the subject. And the shadow implementation will be imperfect."
Isolating Your Product from the Background
Two main approaches:
Pen Tool (best quality): Manually trace your product's edges for pixel-perfect isolation. Takes 5-15 minutes depending on complexity.
Object Selection Tool (faster): Click Select > Subject or use the Object Selection Tool. Photoshop's AI attempts to isolate your product automatically. Works well for clear edges, struggles with hair, fur, and transparent materials.
Adding Drop Shadow via Layer Styles
Once your product is on its own layer with a transparent background:
- Select the product layer
- Go to Layer > Layer Style > Drop Shadow
- Adjust these settings:
- Opacity: 50-80% (lower for subtle, higher for dramatic)
- Angle: Match your light source direction
- Distance: How far the shadow falls from the product
- Spread: Edge hardness
- Size: Blur amount
Time: 5-10 minutes once the product is isolated.
Drop shadows work well for furniture, shoes, and home goods. They provide depth without requiring realistic light physics.
Creating a Realistic Cast Shadow Manually
For hero images and marketing materials, a manual cast shadow looks more natural than Layer Styles.
- Duplicate your product layer
- Go to Edit > Transform > Distort and drag to match the shadow perspective
- Fill the distorted layer with black (Edit > Fill > Black)
- Apply Gaussian Blur (Filter > Blur > Gaussian Blur), typically 10-30px
- Reduce opacity to 40-70%
- Add a layer mask and use a gradient to fade the shadow as it extends from the product
Time: 15-25 minutes per image. The result looks more realistic but requires understanding how light and shadow interact.
Adding Reflection Shadows for Luxury Products
Reflection shadows suggest your product sits on a polished surface. They work well for jewelry, tech products, and cosmetics.
- Duplicate your product layer
- Go to Edit > Transform > Flip Vertical
- Position the reflection directly below the product
- Add a layer mask and apply a linear gradient from black to white
- Reduce opacity to 20-40%
Time: 10-15 minutes per image.
The Catalog Consistency Problem
Here is where Photoshop workflows fall apart.
"When products line up in neat rows on a product page, product photo consistency is vital for a professional look that instills credibility and trust," notes Tom Crowl Photography.
Manual editing produces variation. Even skilled editors make slightly different decisions for each image. The shadow angle drifts by a few degrees. The blur radius varies. The opacity changes. Your product grid looks subtly inconsistent.
For batch processing, clipping paths and drop shadow application takes 5-10 minutes per image even for experienced editors.
Do the math for a realistic catalog:
100 SKUs x 6 images each = 600 images
At 20 minutes average per image for shadow work, that is 200 hours of editing. At $30-50/hour for a retoucher, you are looking at $6,000-10,000 just for shadow editing. Outsourced retouching runs $1-5 per image ($600-3,000) but adds 24-48 hour turnaround times per batch.
Shadow editing represents roughly 30-40% of total post-production time in e-commerce photography. It is technically demanding and repetitive.
AI Tools for Product Photo Shadow Editing
AI tools have changed this calculation. Batch editing software can reduce post-production time by up to 96% according to Imagen AI. AI tools cut batch editing times by up to 40% compared to manual workflows even in more conservative estimates.
Not all AI tools handle shadows equally. Generic background removers often clip contact shadows incorrectly, making products float. Image generators like Midjourney can create shadows but distort product details in the process.
| Tool | Shadow Capabilities | Best For | Limitations | Cost |
|---|---|---|---|---|
| Nightjar | Remove/add shadows via plain-English edits; reusable styles for catalog consistency | E-commerce brands with 10+ SKUs | Learning new platform | Subscription with Credits |
| Photoshop (AI features) | Content-Aware Fill, Object Selection | Single images, precise control | Still requires Photoshop knowledge; batch processing limited | $22.99/mo |
| Free AI removers (Fotor, LightX) | Basic shadow removal | Quick fixes, non-professional use | Limited control; artifacts common | Free-$10/mo |
| Midjourney/DALL-E | Can generate shadows in new images | Creative generation | Visual drift; distorts product details | $10-60/mo |
| Outsourced retouching | Professional-quality shadow work | Brands with budget | 24-48 hr turnaround; per-image cost | $1-5/image |
How Nightjar Handles Shadow Editing for E-commerce
Nightjar takes a different approach than traditional editing tools. Instead of learning which Photoshop panel to click, you describe the change you want in plain English. Nightjar has an Edit tab built for exactly this: a multi-image board where you add product images and type what should change, with Edit Shortcuts that pre-fill common edits.
Type "remove the shadow" and the shadow is removed. Type "add a soft natural shadow" and one is added. Because the edit is described, not painted, you are not cloning pixels or distorting a layer by hand. The model places the shadow against the product's shape, the light direction, and the surface it sits on.
This matters because painting a black blob under your product rarely looks right. It lacks the falloff and direction of real light. A described edit keeps the product itself anchored while the shadow changes.
The harder problem is the next 100 images, not the one in front of you. Generic AI tools drift: the shadow angle shifts, the softness changes, the contact point moves. Nightjar handles that with reusable ingredients. A Photography Style is a saved visual direction that controls camera feel, lighting, and shadow behavior, and you can apply the same one across products so the lighting reads as one catalog. Nightjar also has a feature called Recipes: a saved Create-form setup that captures the Photography Style, composition, background, and output settings, so you can apply the same look to the next SKU without rebuilding the brief.
Outputs support the formats and aspect ratios ecommerce needs, so you can match Amazon's pure white main-image rule with a 1:1 listing image or produce lifestyle variants for secondary slots.
Related resources:
- How can I add shadows to my product photos using AI?
- How can I change the background color while retaining shadows?
- How to create consistent product catalog images
Preventing Shadow Problems During the Photoshoot
The best shadow edit is the one you never have to make.
Proper lighting setup during your photoshoot reduces post-production work dramatically. A few principles:
Use diffused light. Softboxes or large windows with sheer curtains create soft, manageable shadows. Direct flash or bare bulbs create harsh shadows that require heavy editing.
Light tents eliminate harsh shadows for small products. These translucent enclosures wrap light around your product from all angles. Good for jewelry, cosmetics, and small electronics.
Two-light setup at 45-degree angles. Position lights on either side of your product, each at roughly 45 degrees. This minimizes single-direction shadows and reduces contrast.
For detailed lighting guidance, see our article on light box product photography.
Frequently Asked Questions
How do I remove harsh shadows from product photos in Photoshop?
Use the Clone Stamp Tool to sample clean background areas and paint over shadow regions, or select the shadow with the Patch Tool and drag it to a clean area for automatic blending. For large uniform areas, Content-Aware Fill (Edit > Content-Aware Fill) automates the process. Each method takes 5-20 minutes per image depending on shadow complexity.
What type of shadow should I add to product images for e-commerce?
Drop shadows work best for furniture, shoes, and home goods. Reflection shadows suit jewelry, tech products, and luxury cosmetics. For Amazon main images, use minimal contact shadows or none. Match shadow type to product category and platform requirements.
Does Amazon allow shadows on product images?
Amazon requires pure white backgrounds (RGB 255, 255, 255) for main product images and states that shadows should be minimal. Heavy shadows can trigger listing suppression. The safest approach for main images is shadow removal or subtle contact shadows. Secondary images have more flexibility for lifestyle context with natural shadows.
What is the difference between drop shadow and natural shadow?
Drop shadows are created in post-production and appear directly beneath or behind an object, providing depth without directional specificity. Natural (cast) shadows are created during photography by actual light sources and fall in a specific direction based on light angle. Natural shadows look more realistic but require consistent lighting during shoots.
Can AI remove shadows from photos automatically?
Yes. AI tools like Nightjar can remove shadows from a plain-English instruction such as "remove the shadow." Generic AI background removers also remove shadows but often clip contact shadows incorrectly, making products appear to float. For e-commerce use, choose AI tools designed for product photography, where the product is kept anchored while the shadow changes.
How long does it take to add a shadow in Photoshop?
Adding a basic drop shadow via Layer Styles takes 5-10 minutes once the product is isolated from its background. Creating a realistic manual cast shadow with proper perspective and blur takes 15-25 minutes. Product isolation adds 5-15 minutes depending on edge complexity.
How do I maintain consistent shadows across my product catalog?
In Photoshop, create a shadow action and apply it via batch processing, though results still vary based on product shape. AI tools like Nightjar help keep this consistent through reusable ingredients: a saved Photography Style carries the lighting and shadow direction, and a Recipe saves that setup so the same treatment is applied to the next SKU. For catalogs over 50 SKUs, consistency is the main reason to move from manual Photoshop to AI-based workflows.
References
- Nightjar - AI product photography
- Adobe - Remove Shadows in Photoshop - Official Photoshop tutorial
- Adobe - Add Drop Shadow - Official Photoshop tutorial
- Squareshot - 88% consumer photography statistic
- Lenflash - 22% return rate statistic
- Crop.photo - Batch processing time data
- Tom Crowl Photography - Catalog consistency guidance
- Clipping Path Studio - Photoshop drop shadow tutorial
- Imagen AI - Batch editing time reduction statistic
- 360 Research Reports - AI tools efficiency data