Why Most Light Box Guides Won't Tell You the Full Story
Here is something you will notice if you search for light box reviews: almost every article is trying to sell you one. Affiliate links pepper the recommendations. The tutorials assume a light box is always the right choice. Nobody mentions what happens when you outgrow it.
This matters because product images drive purchasing decisions. According to Shopify, 75% of shoppers rely on product images before buying. And GrabOn reports that 22% of returns happen because products look different in person than they did online. If images carry this much weight, the question becomes: is a $50 light box actually the answer?
Sometimes yes. Sometimes no.
Light boxes have legitimate uses for beginners, small catalogs, and certain product types. They also have real limitations that sellers discover only after investing time and money. This guide covers both sides honestly. You will learn when a light box makes sense, when it becomes a bottleneck, and what alternatives exist when you need to scale beyond what physical equipment can handle.
For context, I will also cover modern AI tools like Nightjar for sellers who need consistency across large catalogs or want lifestyle images that light boxes simply cannot produce.
What Is a Light Box for Product Photography?
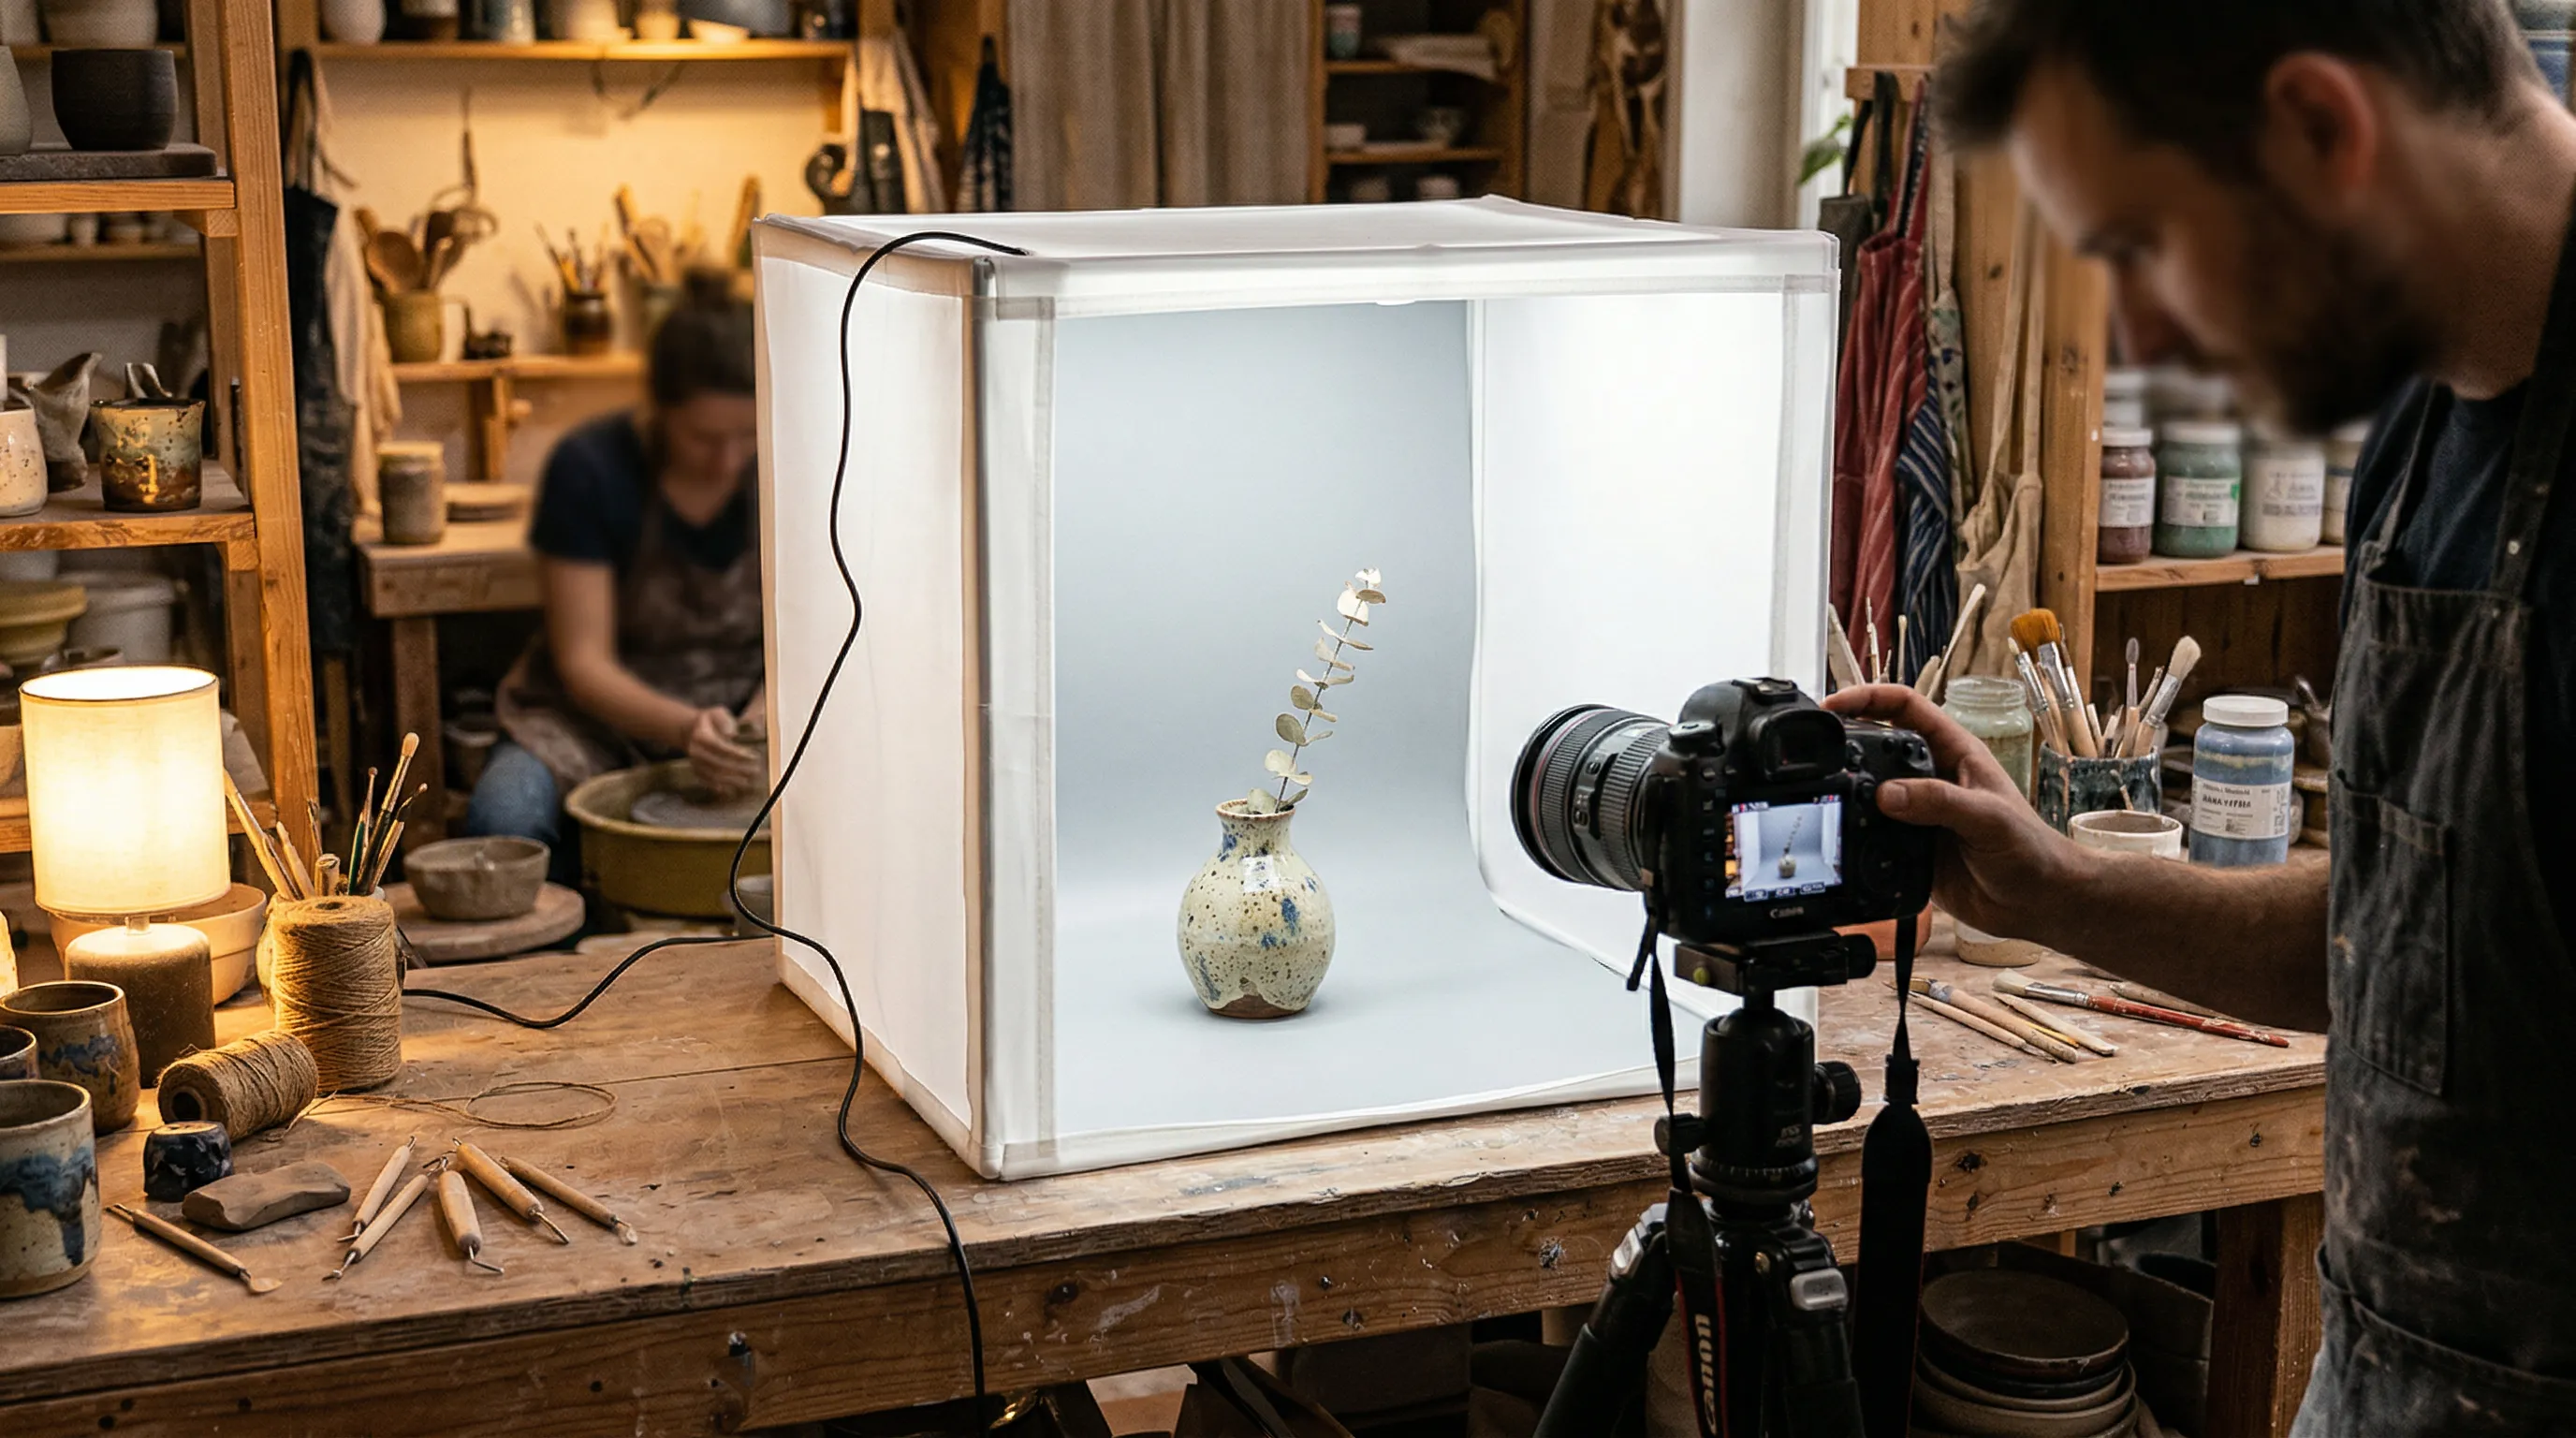
A light box, sometimes called a photo light box, light tent, or portable photo studio, is a cube-like structure with translucent sides and an open front. You place your product inside, position lights outside the walls, and the translucent material diffuses light evenly around the subject.
The physics are simple. Hard light creates harsh shadows. Soft light wraps around objects more gently. The translucent walls scatter incoming light, so instead of a single directional source creating strong shadows on one side, light arrives from multiple angles simultaneously. The result is even illumination with minimal shadows.
Most light boxes include a curved white backdrop, sometimes called a cyclorama, that eliminates the hard line where the floor meets the back wall. This creates the seamless white background you see on Amazon, eBay, and Shopify listings.
How Light Boxes Create Diffused Lighting
The typical setup places LED panels or strip lights outside the box, angled toward the translucent walls. As light passes through the material, it scatters. Think of it like the difference between direct sunlight and overcast sky. Direct sun is harsh. Clouds act as a giant diffuser, spreading light more evenly.
Some photographers add small reflectors inside the box to bounce light back onto the front of products, filling any remaining shadows. The combination of surrounding diffused light plus strategic reflection can produce clean images suitable for marketplace listings.
Who Uses Light Boxes?
Light boxes appeal to a specific audience. Ecommerce sellers on Amazon, Etsy, and eBay use them for catalog images. Small business owners photograph their own products rather than outsourcing. Hobbyists and craft sellers test whether professional photography is worth further investment.
The common thread: smaller products that fit inside the box. Jewelry, watches, cosmetics, small electronics, and similar items are the sweet spot. Anything larger than a shoebox starts creating problems.
Why Light Boxes Work (When They Work)
Before discussing limitations, light boxes deserve fair treatment. For the right situation, they solve real problems.
A beginner with no photography experience can achieve consistent, repeatable results without understanding complex lighting setups. There is no need to learn about key lights, fill lights, rim lights, or light ratios. Set up the box, turn on the LEDs, shoot. The learning curve is gentle.
The cost is accessible. A decent light box runs $50-150. Add a smartphone or entry-level camera, and you have a functional product photography setup for under $300 total. For a seller testing whether ecommerce is viable, this is a low-risk entry point.
Light boxes also handle one category exceptionally well: highly reflective objects. Jewelry, watches, glassware, and polished metal surfaces create problems with direct lighting because they reflect the light source itself. The diffused environment of a light box minimizes these reflections, making it easier to capture clean images of shiny products.
Best Use Cases for Light Boxes
Light boxes make sense when:
- Your catalog contains fewer than 50 products
- You are testing whether product photography is worth professional investment
- You shoot highly reflective products that need controlled reflections
- You enjoy the hands-on process and have time to invest
- Your products physically fit within size constraints
A seller with 20 SKUs refreshing images quarterly is a reasonable light box candidate. A seller with 500 SKUs launching new products weekly is not.
What to Look for in a Light Box
If you decide a light box fits your situation, quality matters. Cheap units with poor LEDs will cost you time in post-processing.
| Feature | Why It Matters | What to Look For |
|---|---|---|
| CRI Rating | Color accuracy in photos | CRI 90+ (95+ ideal) |
| Size | Determines what products fit | Match to your largest product + 4-6" clearance |
| LED Brightness | Exposure flexibility | Dimmable, 1,000+ lumens |
| Color Temperature | Natural-looking images | 5500K (daylight balanced) |
| Shooting Windows | Angle flexibility | Top + front openings minimum |
CRI, or Color Rendering Index, measures how accurately a light source renders colors compared to natural daylight. A CRI below 80 causes color shifts that require correction in editing. Budget units often skimp here. Spending $30 extra on a CRI 95+ light box saves hours of post-processing across a catalog.
According to Imagen AI, "With the right light box, even beginners can achieve crisp, professional-looking images without the steep learning curve typically associated with complex lighting setups."
Best Light Boxes by Price Point (2026)
For sellers who decide a light box is right for their situation, here are the notable options by budget.
Budget Light Boxes ($30-60)
LimoStudio at around $30 offers a pop-up design with included tripod. It is a functional starter option for testing whether light box photography fits your workflow.
Glendan Portable Photo Studio at around $45 includes six backdrop colors, four reflection boards, and a carry bag. The extra backdrops provide flexibility for products that look better against colors other than white.
Mid-Range Light Boxes ($60-150)
PULUZ Portable Photo Studio ($80-100) is where quality starts to matter. CRI 95+, 480 LEDs, 1-100% dimming control, and both top and front shooting windows. Assembly takes about 10 seconds with practice.
Travor Portable Studio at around $58 features rotating LED panels that allow nuanced control over reflections, useful for products with mixed matte and glossy surfaces.
AmazonBasics Portable Foldable at around $135 offers extra internal space for larger products. If your catalog includes items pushing the size limits of typical light boxes, the additional room matters.
Premium Light Boxes ($150-500+)
Foldio3 with Halo Bars at around $200 measures 25"x25"x22" with magnetic structure and three dimmable LEDs. The top shoot-through window enables overhead angles without repositioning the box.
MyStudio MS20 at around $196 includes a single-piece hard cyclorama background, eliminating the seam issues that plague cheaper units.
Ortery Photosimile 200 at $500+ integrates with control software for workflow automation. Canon and Nikon compatible. This is for sellers who want to maximize efficiency within the light box paradigm.
Size Guide
| Light Box Size | Best For |
|---|---|
| Small (8-16") | Jewelry, watches, cosmetics, small electronics |
| Medium (20-32") | Shoes, handbags, toys, small appliances |
| Large (35"+) | Home decor, larger electronics, flat-lay clothing |
When selecting size, add 4-6 inches of clearance beyond your largest product in each dimension. Products touching the walls or backdrop create shadows and reflections that defeat the purpose of diffused lighting.
The Limitations Nobody Mentions in Light Box Reviews
This section separates an honest guide from an affiliate-driven roundup. Light boxes have real constraints that sellers discover after investing time and money.
Flat, Boring Lighting
The same property that makes light boxes easy for beginners, even diffusion from all directions, creates a visual problem. Products look flat. Shadows are what give objects dimensionality. When you eliminate nearly all shadows, products can appear two-dimensional in photos.
This is why professional photographers rarely use light boxes. As Iconasys notes, "Professional Photographers do not use Light Boxes. Light boxes often produce a very flat, non-dramatic light and will yield boring product images."
For marketplace listings where clean white backgrounds are the primary requirement, this may be acceptable. For brand-building images where products should look premium and desirable, flat lighting works against you.
Size Constraints
Most light boxes accommodate products roughly the size of a shoebox. Larger items create problems: the product touches the walls, fills the frame without adequate background space, or requires repositioning the shooting window so often that consistency suffers.
There is no practical light box solution for furniture, large electronics, or apparel photographed on models. The medium inherently limits what you can shoot.
No Lifestyle or Contextual Images
Light boxes produce white backgrounds. Some include colored backdrops. That is the extent of their capability.
Modern ecommerce increasingly relies on secondary images showing products in context. A coffee maker on a kitchen counter. Running shoes on a trail. Jewelry worn by a model. According to GrabOn, 360-degree product images boost conversion rates by 22%, and 63% of shoppers prefer a 360 view before purchasing.
Light boxes cannot produce these contextual images. Sellers who need lifestyle shots must set up an entirely separate workflow, usually involving different equipment, locations, and skills.
The Scalability Problem
Photographing 10 products in a light box is manageable. It might take a weekend.
Photographing 100 products is a part-time job. At 20-30 minutes per product (setup, shooting multiple angles, basic post-processing), you are looking at 33-50 hours of work.
Photographing 1,000 products is unsustainable for most sellers. That is 330-500 hours, or roughly 8-12 weeks of full-time effort.
Each product requires the same repetitive sequence: position product, adjust lighting if needed, shoot front angle, reposition, shoot side angle, reposition, shoot other side, reposition, shoot back, reposition, shoot detail, review images, move to next product. The time investment scales linearly with catalog size.
Inconsistency Across Sessions
Even with a standardized setup, results vary. You shoot products on a Tuesday. A week later, you shoot more on a Thursday. The images look slightly different.
LED color temperature drifts over bulb lifespan. Room ambient light changes between sessions. Product positioning varies by millimeters, but those millimeters affect shadow placement. Maintaining visual consistency across a catalog photographed over multiple sessions is genuinely difficult.
Customers notice inconsistency, even if they cannot articulate why. Some product images look professional. Others look slightly off. The catalog lacks visual cohesion.
The Pure White Background Challenge
Marketplace requirements often specify pure white backgrounds. Amazon's main image requires RGB 255,255,255. Getting there is harder than it appears.
A light box produces white backgrounds, but rarely pure white. The actual RGB values might be 248,248,248 or 252,250,251. To the human eye, this looks white. To Amazon's automated systems, it may trigger a rejection.
Achieving true pure white requires either precise lighting ratios that overexpose the background while properly exposing the product, or post-processing to push the background values to pure white. Many sellers unknowingly submit off-white images.
As Pro Photo Studio observes, "The primary downside of lightbox photography is the restricted control over lighting. The fixed positions of lights and lack of modifiable lighting equipment hinder the ability to alter the lighting conditions to meet specific needs."
The Real Cost of Light Box Photography (Time Included)
Equipment cost is the visible expense. Time is the hidden one. Most light box content focuses on the former and ignores the latter.
Equipment Costs (The Visible Part)
A realistic light box setup includes:
- Light box: $50-150
- Lighting upgrades (CRI 95+ LEDs): $30-80
- Backdrop materials: $20-40
- Camera/phone tripod: $25-50
Total equipment investment: approximately $125-320.
This appears affordable. The problem is what comes next.
Time Costs (The Hidden Part)
For each product photographed:
- Setup and positioning: 5-10 minutes
- Shooting multiple angles: 10-15 minutes
- Post-processing for pure white: 5-10 minutes per image
Total time per product: 20-35 minutes.
If your time has value, these minutes have cost. Even at a modest $25/hour opportunity cost, you are spending $8-15 per product in time alone.
True Cost by Catalog Size
| Catalog Size | Equipment (Amortized) | Time @ $25/hr | Post-Processing | Total Cost | Per Product |
|---|---|---|---|---|---|
| 25 products | $6/product | $208-365 | $52-104 | $266-475 | $10.64-19.00 |
| 100 products | $1.50/product | $833-1,458 | $208-417 | $1,043-1,877 | $10.43-18.77 |
| 500 products | $0.30/product | $4,167-7,292 | $1,042-2,083 | $5,209-9,375 | $10.42-18.75 |
The pattern is clear. Equipment cost amortizes as catalog size grows, but time cost per product stays constant. A 500-product catalog requires 166-292 hours of work, regardless of how cheap the light box was.
Light boxes appear inexpensive because equipment cost is low. The hidden cost is time. For sellers with more than 50 products, the time investment alone often exceeds what AI tools would cost for equivalent output.
When to Skip the Light Box: Modern Alternatives
Not everyone needs to skip light boxes. But for certain situations, better options exist.
Professional Photography Services
Professional product photography runs $50-200 per image. For high-ticket items where margins support the investment, or for hero images in brand campaigns, professional quality justifies professional cost.
The trade-off is straightforward: highest quality, highest cost, requires outsourcing and coordination. For ongoing catalog updates at scale, professional photography becomes prohibitively expensive.
AI Product Photography Tools
AI product photography emerged as a practical option in 2024-2025. The workflow is different: upload a product photo (from any source, including a phone snapshot), and the AI generates multiple angles, backgrounds, and styles.
This approach makes sense for catalogs over 50 products, sellers needing lifestyle images, and anyone prioritizing consistency across a large inventory. More than 10,000 brands now use Nightjar this way, which signals how far the workflow has moved from physical equipment.
| Feature | Nightjar | Light Box | Professional Studio |
|---|---|---|---|
| Cost per image | ~$0.25-0.50 | ~$10-19 (time included) | $50-200 |
| Lifestyle images | Yes | No | Yes |
| Multiple angles | Yes (from single photo) | Manual repositioning | Yes (manual) |
| Consistency across catalog | Strong (reusable settings) | Variable | Good |
| Pure white background | Built in | Requires post-processing | Yes |
| Time per product | ~2-3 minutes | 20-35 minutes | N/A (outsourced) |
| Physical equipment | None | Required | N/A |
According to Hippist AI, "Businesses using AI have generated over 50 final product images in under 6 hours, saving 160+ hours per batch compared to traditional workflows."
How Nightjar Addresses Light Box Limitations
For sellers outgrowing their light box, Nightjar solves specific pain points.
Flat lighting: Virtual studio lighting with controlled shadows and highlights adds depth while maintaining clean backgrounds. Products look three-dimensional.
Size constraints: No physical limitations. Works with any product photo regardless of original shooting conditions or product dimensions.
No lifestyle images: Background scenes and lifestyle-oriented generation place products in real-world settings, creating secondary images impossible with physical light boxes.
Scalability: Generate hundreds of consistent images without repetitive physical setup. The bottleneck shifts from photographing to uploading.
Inconsistency: Nightjar splits the variables that drift into reusable ingredients. A Photography Style holds the camera feel and lighting, a Composition holds framing and angle, and a reusable setup keeps a catalog visually aligned so every product looks like it came from the same shoot.
Pure white challenge: A clean white background is built into the listing Workflow, which helps meet Amazon and Shopify image expectations with less manual editing.
For a 100-product catalog needing 5 images each, light box photography requires roughly 167-292 hours of work. The same output through AI tools takes perhaps 5-8 hours of upload and generation time. The math becomes difficult to ignore at scale.
How to Build a DIY Light Box (Budget Option)
For sellers testing whether product photography is worth any investment, a DIY light box costs almost nothing.
Materials Needed
- Large cardboard box
- White tissue paper or diffusion material
- White poster board (backdrop)
- Clear tape
- 2-3 desk lamps or LED lights
Total cost: $25-40 for quality materials.
Basic Steps
Cut windows in the sides and top of the box, leaving a frame of cardboard around each opening. Tape diffusion material (tissue paper works) over the windows. Insert white poster board curved from the back wall to the floor, creating a seamless backdrop. Position lamps outside each window, angled inward. Place your product inside and shoot through the front opening.
The result is functional, if imperfect. DIY boxes produce images good enough to test whether your products photograph well, whether customers respond to better imagery, and whether photography fits your workflow.
DIY Limitations
DIY constructions are fragile. Cardboard warps, tape fails, tissue paper tears. The build degrades over time and requires periodic rebuilding.
Consistency is worse than commercial units. Homemade diffusion material produces less even light distribution. Positioning variations between sessions are harder to control.
A DIY light box is a test, not a long-term solution. Most sellers who validate product photography as worthwhile either upgrade to commercial light boxes or transition directly to AI tools within a few months.
Light Box vs. Alternatives: Which Is Right for You?
The right choice depends on your specific situation. Here is a decision framework.
| Your Situation | Best Option | Why |
|---|---|---|
| < 25 products, beginner, tight budget | DIY or budget light box | Low investment to test and learn |
| 25-50 products, small business | Mid-range light box | Good balance of quality and cost |
| 50-200 products, growing catalog | AI tools (Nightjar) | Time savings outweigh subscription cost |
| 200+ products, scaling ecommerce | AI tools (Nightjar) | Only practical option for consistency at scale |
| Need lifestyle images | AI tools or professional photography | Light boxes cannot produce these |
| Highly reflective products (jewelry) | Light box + post-processing | Controlled reflections are critical |
| High-ticket items, brand building | Professional photography | Investment justified by product margins |
Light boxes are legitimate tools for the right situation. If you are photographing a small catalog, learning the basics, or shooting highly reflective items, a $50-150 light box is a reasonable investment.
But if you are scaling beyond 50 products, need lifestyle images, or value your time at any meaningful rate, AI product photography delivers better results with less effort. The technology has reached a point where physical constraints no longer apply to catalog imagery.
Most serious ecommerce sellers graduate from light boxes within their first year. They start with the accessible entry point, hit the limitations, and move to tools that scale with their business.
Frequently Asked Questions About Light Box Photography
Is a light box worth it for product photography?
For beginners with small catalogs under 50 products, yes. A light box provides consistent diffused lighting without requiring photography expertise. However, if you have a larger catalog or need lifestyle images, AI tools offer better value when you factor in time investment. Light boxes cost $50-150 for equipment but require 20-35 minutes per product including post-processing.
What size light box do I need for product photography?
Choose a light box 4-6 inches larger than your biggest product in each dimension. Small boxes (8-16") work for jewelry, watches, and cosmetics. Medium boxes (20-32") handle shoes, handbags, and small appliances. Large boxes (35"+) accommodate home decor and flat-lay clothing. Most ecommerce sellers start with a 20-24" box as a versatile middle ground.
Do professional photographers use light boxes?
Rarely. Professional product photographers typically use individual lights with modifiers like softboxes, diffusers, and reflectors for precise control over shadows and highlights. Light boxes produce flat, even lighting that lacks the depth and dimensionality professionals create. Light boxes are beginner tools, not professional ones.
How do I get a pure white background with a light box?
Getting true RGB 255,255,255, which Amazon requires, typically needs post-processing even with a light box. Overexpose slightly by 1/3 to 1 stop, keep even lighting across the backdrop, and use photo editing software to push the background to pure white. Alternatively, AI tools like Nightjar build a clean white background into the listing workflow, which reduces the manual editing step.
Can I make my own DIY light box for product photography?
Yes. A DIY light box requires a cardboard box, white tissue paper for diffusion, white poster board for the backdrop, and 2-3 desk lamps. Total cost is $25-40. DIY boxes work for testing whether product photography is worth further investment, but they are fragile and less consistent than commercial options. Most sellers upgrade within a few months.
What is CRI and why does it matter for light boxes?
CRI (Color Rendering Index) measures how accurately a light source renders colors compared to natural daylight. A CRI of 90+ helps your product colors appear accurate in photos, reducing the need for color correction in post-processing. Budget light boxes often have CRI below 80, causing color shifts that require editing. Look for CRI 95+ for best results.
How long does it take to photograph products with a light box?
Plan for 20-35 minutes per product when including setup, positioning for multiple angles, shooting, and basic post-processing. A 7-image Amazon listing with front, back, sides, top, detail, and lifestyle shots requires at least 6 physical repositions per product. For large catalogs, this time investment is the primary reason sellers transition to AI tools that generate multiple angles from a single photo.
References
- Amazon Seller Central - Product image requirements
- Shopify Help Center - Product media specifications
- GrabOn - Product photography statistics
- Shopify Blog - Lifestyle photography guide
- Iconasys - Light box analysis
- Pro Photo Studio - Lightbox vs professional lighting comparison
- Imagen AI - Light box photography tips
- Hippist AI - AI vs traditional photography costs
- Waveform Lighting - CRI technical explanation